Die By the Sword Game-Play Example 2


Before continuing with this blog, make sure you’ve read the previous for the first part of the game-play example.

Introducing Challenges

About to hit Phase 2, and with the Scene firmly set, the GM introduces the Challenges.

As there are three players in this example, the GM can either create 1 Vital Challenge per player at Totals of 1 to 3, or two Vital Challenges, one at 1-3, the other at 4-5.

The GM decides that the armoured Mercenaries are clearly a massive and direct issue, and will be more competent than trained soldiers, so they set them to a Total of 4.

Any aggression will also cause a wider Bar Fight. There’s not likely to be much skill displayed or individual danger demonstrated by the punters, but due to the general chaos, the GM sets a Bar Fight Challenge Total at 3 (5 is the highest possible total, so 3 is a moderate threat).

There can also be an Additional Challenge of 1-3 per 2 players or 4-5 per 3 players.

They decide that Bar Furniture suits; you could trip on it, be clubbed by it, but also use it as a weapon, to hide etc. As the GM has 3 players, they set the Total to 4.

Each Challenge will have at least one Obstacle (player descriptions involving this phrase can Trigger Choice Penalty of at least -1) and Opportunity (descriptions can Trigger Bonuses instead). These begin as Hidden and are secretly decided and written down by the GM. These can be Revealed either through role-play that the GM feels makes Obstacles/Opportunities obvious, through guesses from the players or through use of Success Points.

Challenges may also have an Opposition, relating to another Challenge, where if the Totals are different, the difference may create Bonuses or Penalties as the Challenge dictates.

The GM reveals that Bar Furniture has Opposition to Bar Fight, and with 4 vs 3, anyone contending with the Bar Fight in a manner that puts them in danger of Bar Furniture will receive a -1 to their Choice. However, if Bar Furniture’s Total is reduced below Bar Fight, then Choice Bonuses may occur.

Opposition can also be created with Success and Failure Points.

Phase 2

As Ter-Saa refuses to drop the empty bottle, one of the two mercenaries that have approached the table (there are two more watching) moves in to take it.

Just Another Job Ter Saa 1.jpg

Ter-Saa uses their other hand to grab the reaching arm, describes creating an arm lock. The GM describes the sudden movement throwing off the Mercenary’s balance, and Triggers the Challenge’s Hidden Opportunity: Drunk. They tell the player that they have Triggered an Opportunity, but not what it is (though their description should give a clue).

(Decision: Ter-Saa spends 2 Focus Points, gets a +1 Bonus from the Opp, for a Choice Total of 3 vs 4. For their Limit Adjustment, they Fuel 1 Curse Point for “impose weight on others).

The GM describes the Mercenary shoving Ter-Saa against the wall, and Triggers one of their Berserker Trope Penalty Points, as their control begins to turn into fury.

(Choice Total: 2. Limit Adjustment: Exhaustion increased to 1, as they are winded.)

There is a cry of ‘FIGHT!’ in the background. The person who yells it is punched in the face. Chaos erupts in the background.

Now, Choice Totals, via repeat Decisions, can continue to build and decline until the player decides to Resolve their Choice with either Success Points, Failure Points or Stalemate. This requires the player deciding when they have Burned enough points or when they cannot afford to Adjust any more Limits, and when to accept the fate of their Choice.

The GM can cut to other players to start making Decisions before other Choices are Resolved, as situations change in the Scene. Players can either make a separate Choice to deal with the same or different Challenges as other players (starting at 0) or a Collective Choice, adding their Decisions to that of other players.

Currently, Ter-Saa is tackling the Mercenaries Challenge; another player could Engage the Challenge by descriptively dealing with any of the Mercenaries, not necessarily the one Ter-Saa is fighting.

Hoo-Len approaches the other Mercenary that approached their table and tussling their hair, speaking in a softly softly manner, asks very nicely if they wouldn’t mind pulling their friend off of her bodyguard. She Burns her second Way with Words Bonus Point, and 2 Focus, to bump the collective Choice Total to 5. With one Limit Adjustment, she Fuels 1 more Curse Point for the Decision Criteria of “fool others with your voice.” The one merc, clearly immensely enamoured and stuttering a little, tries to pull their ally off of Ter-Saa.

Just Another Job Hoo-Lin 1

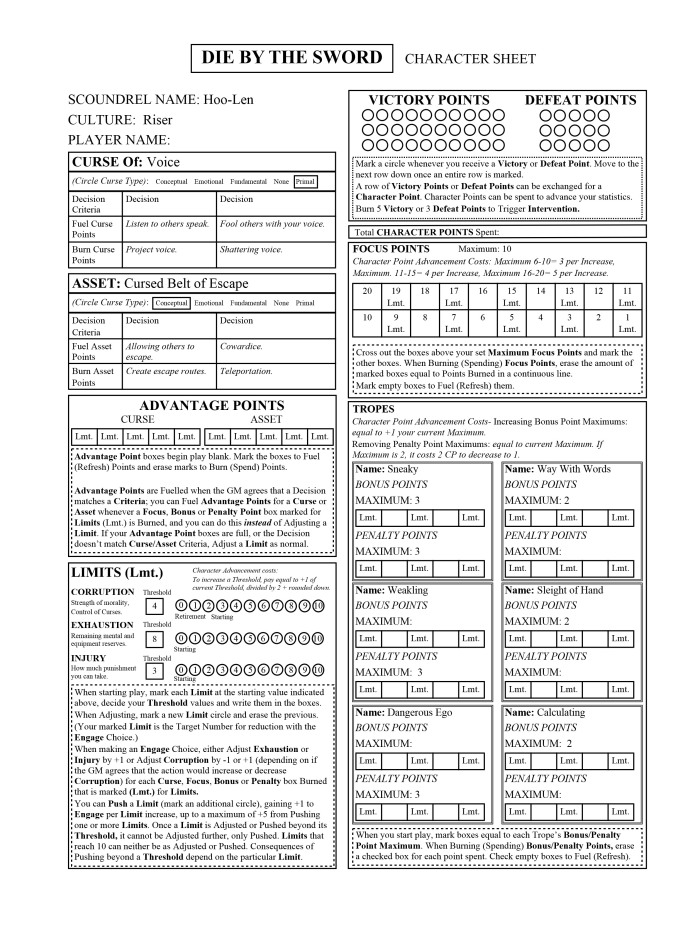
The players decide to Resolve there, getting 1 Success Point. Hoo-Len decides to use it to create a Temporary Ally Opportunity to make Mercenaries to fight. (Earning 1 Victory Point to make the story more interesting with an Opportunity, rather than reducing the Challenge Total.) They also accurately guess that the Mercenaries are also Drunk, so the GM reveals this Opportunity; with the right description, any ally can Trigger a free +2 Bonus in the next Phase.

As Ter-Saa helped create a Success Point and Exhausted themselves to do it, they earn a Victory Point. Victory Points can be saved (along with Defeat Points) and traded to enhance character stats between chapters, or spent when you have 5 of them (or 3 Defeat Points) for Intervention, dramatic help when you really need it.

OfficialSheet901.jpg

Bar Fight is a Vital Challenge. This means that if Nesker does not Engage it, there will likely be severe negative consequences at the end of the Phase.

The GM describes objects flying at the originators of the Bar Fight; this means Nesker is Engaging both Bar Fight and Bar Furniture and up against Furniture’s higher Challenge Total of 4, and receiving a -1 Penalty for Opposition.

Just Another Job Nesker 1.jpg

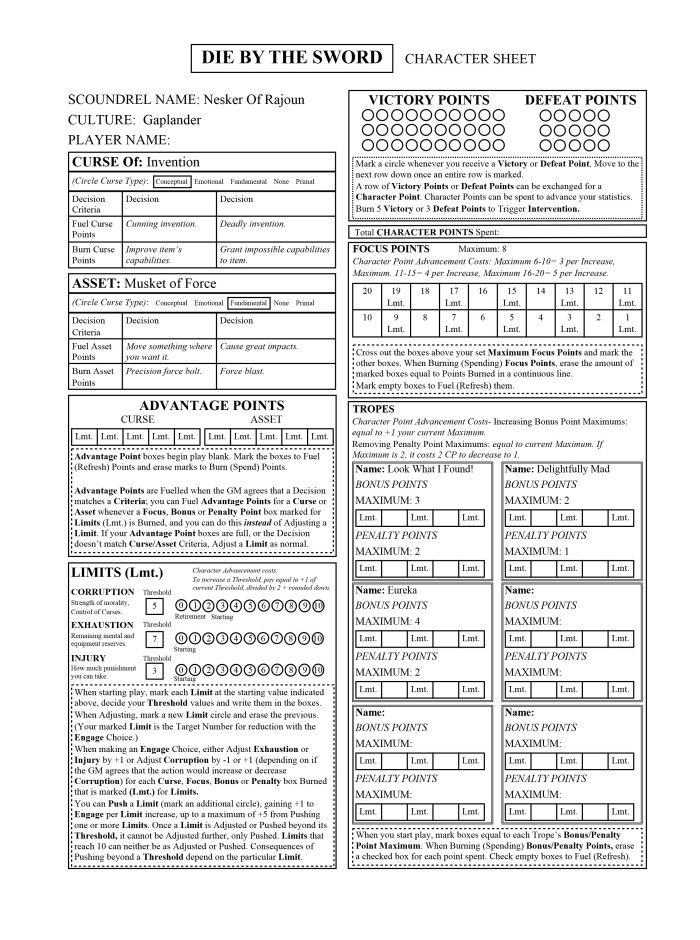
Nesker flips the table over and dives behind it. With his description, he Triggers both the Hidden Opportunities of Bar Furniture and Bar Fight (Stay Put and Take Cover); this would give a free +2, but due to Opposition, goes down to +1.

He spends a Point of Focus and a Bonus Point from Eureka, for a Decision of 3 vs 4.

With 2 Limit Adjustments, he Fuels 2 Curse Points for “cunning invention.”

The GM describes the glass of thrown bottles shattering dangerously near him.

Nesker’s player describes starting picking up the hands with his glass and madly throwing it, Burning both of his Delightfully Mad Bonus Points. For his Limit Adjustment, he decides to increase Injury to 1, due to cutting his hands. (Player can decide Limit Adjustments, but the GM has right of veto, if they are deemed to be inappropriate.) This Decision increases his Total of 3 to 5.

With 1 Success Point, Nesker reduces Bar Furniture from 4 to 3, as some of the weapons are getting broken, and the players have a shield to get behind. This has an added benefit of matching the Bar Fight and Bar Furniture Challenges Total, so Opposition is at 0.

He earns one Victory Point for choosing to increasing Injury and earning a Success Point for that Choice.

Every player has made their Choice, all Vital Challenges are Resolved, so onto the next Phase.

Die By the Sword- Game-Play Example 1

Introduction

Right, time for Part 1 of a game-play example of Die By the Sword, starring pregen characters Hoo-Len, Ter-Saa and Nesker.

These next few blogs will showcase how the basic GMing and player game-play mechanics work, as well as giving you an idea of the versatility of the character stats.

This example will feature a bar fight, and only one character might be termed a ‘combat’ character in a traditional sense.

Firstly, let’s take a look at the character sheet, via Hoo-Len, so I can get into how things are recorded on the character sheet.

Just Another Job Hoo-Lin 1.jpg

Character Sheet Basics

When play begins, all Focus Points from the Maximum and below are marked. You erase them to Burn Points and tick them when Fuelling (to get Points back). For Tropes, mark the Bonus and Penalty Points up to the Maximum. Advantage Points (Curse and Asset) are blank to begin with and Fuelled during game-play. Limit Thresholds are written in the boxes; all 5s is standard, but this can be altered at character creation, as demonstrated. Starting Limits are indicated on the sheet (3 for Corruption, 0 for Exhaustion and Injury). Whenever you remove a tick from a box marked Lmt to Burn it, this will Adjust one of the Limits. Corruption can be decreased for an action that is moral in nature or increased otherwise, and the other two Limits must be increased when Adjusting. Your encouraged as anti-heroes to make both moral and immoral Choices, otherwise you will have to increase Exhaustion and Injury more often, and thus risk hitting and passing your Corruption Threshold. Instead of Adjusting a Limit, you can instead Fuel an Advantage Points, but only if the Decision you have made as part of the Choice matches one of your Curse or Asset Fuel Criteria. Players wishing to avoid increasing their Limits too far can avoid this by incorporating Advantages into their description. But they only have 5 boxes each, so Fuel them early, and you’ll be approaching Thresholds quickly. Additionally, every Advantage Point will Adjust a Limit, so these are a vital game-changer but can have dangerous ramifications if you use them too much.

Every Choice is a gamble in Die By the Sword.

Scene setting

In the first Phase of the Scene, there are no Challenges to face. Where the Scene begins is described to the players and they are encouraged to role-play, to establish character and what they want to do.

Potential Challenges may be hinted at by the GM, they may have some prepared already, but how the players role-play may indicate either a need for some different Challenges or at least a change to the descriptive nature of ones a GM may intend.

In this example, lets say the Scoundrels (player characters) have just come back from completing a mercenary mission. They are in a watering hole known as the Leaky Tap; a rough and tumble bar, commonly used by local mercenaries, sailors, criminals and other riff raff. The bar is heaving particularly heavily.

The three Scoundrels decide to secure a table in the corner. Hoo-Len is having some of the finest booze she can afford (relatively speaking) and enjoying chatting with bar staff as they approach with more drink. Ter-Saa stands silently, drinking, eyeing up the biggest, scariest, strongest looking patrons. The GM decides that one person in a group of particularly well-armed individuals notices the glance and nudges one of their fellows. Ter-Saa receives a sarcastic smile and a wave.

Nesker is mostly sitting silently too, but with occasional drinks and laughs, as he scrawls out some blueprints.

Phase 1

This is the first Phase of a Scene, so there are no Challenges to face.

Hoo-Len’s player uses her description for the Development Choice where you can either instantly Fuel 2 Points of one type (Focus, Bonus or Advantage) or Burn a Point of 1 type to Fuel 3 of another. She Burns 1 Bonus Point (out of 2) from her Way With Words Trope to Fuel 3 Advantage Points to her Curse, as one of the Fuel Criteria for the Curse is “listening to others speak.”

As she has Burned the first Bonus Point of a Trope, she erases the mark from the first Limit box (indicated as “Lmt” on the character sheet), so she reduces her Corruption by 1 to 2.

Hoo-Lin has Burned 1 point with her Choice, but has 3 other additional Points she can now use in the coming Scene at any time (whereas Way With Words, the Point Burned, was more situational).

Ter-Saa decides to make the Engage Choice. There are no Challenges to Engage, but they expect trouble, so in this case, their Target Number is 0.

The player describes grabbing some empty bottles and lining them all up in easy reach, spending 2 Focus Points as their first Decision (Decision applies when creating a Choice Total when you Engage; Decisions represent each set of points that you choose to spend, an appropriate description and then the GM’s response to that Decision, including any Penalties that occur.)

They Burn a Lmt box; the GM agrees that this matches the ‘dirty fighting’ requirement for the Asset, Cursed Cloak of Battle, and so Ter-Saa Fuels an Advantage Point for their Asset for use for later.

A Choice Total begins at 0, and is now 2; your aim as a playeris try and defeat the Target Number. There are no Challenges yet, so no Obstacles for the GM to Trigger to create Penalties. The GM can still Burn Penalties if they wish, but as a fight as not yet started, they don’t think that Sword Master or Berserker apply, so Burn no Penalties.

The GM asks Ter-Saa’s player if they wish to make any more Decisions; they decline, so the Choice is Resolved. 2 against a Target Number of 0 is 2 Success Points.

(The Choice cheat sheet breaks down the potential options for Success and Failure Points. There are no Challenges yet, so the options are limited.)

Ter-Saa creates an Improvised Weapon Trope with 2 Bonus Points; they have spent 2 Points, but gotten 3 Points in return. In addition, future Choices could be used to Fuel both the lost Focus AND the new temporary Trope, so this is a good tactical move.

They gain a Victory Point for creating a Trope and making the ensuing Scene a little more interesting. (More on Victory Points later.)

Nesker is creating blueprints for an invention rather than haphazardly building one, so the player uses Development to Burn the Penalty Points from their Eureka Trope from 2 down to 1; this will give the GM less room to screw the player with inventions they create throughout the coming Scene.

Ending Phase 1

The armoured mercenaries approach and “what are you looking at?” dialogue inevitably occurs aimed at Ter-Saa. The warrior refuses to answer, one of the opposing mercs, knocks a drink over, Ter-Saa lifts a bottle.. you know the drill.

Next Time…

I explain how Challenges are introduced and how they work and get into the second Phase of the Scene, where the bar fight proper begins.

Die By the Sword Part 2- Interacting With The Game World

Time for part 2 of going into greater detail about Die By the Sword!

If you haven’t read the first blog, I would recommend looking at that first.

The Setting Basics

You live in the Cursed Lands, what remains of the Central Continent. History is sketchy due to the fact that most of mankind on the continent died out when the continent was ripped to pieces, and most of the cities of the Blessed Empire were destroyed or at least ruined.

But what you do know is there used to a veil of energy out to sea, surrounding the Continent, known as the Curtain. The Blessed Empire believed that beyond it lay the path to their God. When they could not pass the Curtain, they sought a way through.

Again, history is sketchy, but eventually, their path into the Curtain released the Primordials. Ancient beings embodying every single building block of the world: a Primordial representing every idea or concept ever conceived, every possible emotional, the fundamental physical and metaphysical parts of the world and every aspect that makes a living creature, as well as representing each distinct creature.

As history tells it (or what little you have) these beings did not care for Humanity. They ignored you. And they sought out like Primordials, and sort to drain and destroy opposing Primordials, the settlements of the Empire were ruined.

Eventually, something was done to remove them from the world. Unfortunately, you don’t know how.

Unfortunately, you cannot destroy energy, only disperse it.

The Curtain is gone now. And each Primordial dispersed into fragments. But their seeming destruction forever changed the lands.

Volcanoes forever rage to the north, destroying whatever cities once lay there. The bulk of remaining cities south of there were ravaged by earthquakes, most dropped into fissures or plunged into the earth. The rain-forest at the centre of the continent was partially flooded, miles high trees pulled in on top of each other, into what now looks like a giant, dead bird nest from afar. Most of the south of the continent was pulled into the sea, and now only the tiniest islands and tallest mountain peaks remain.

And every fragment of Primordial infected either an area of land, person or animal. These fragments became known as Curses.

Welcome to the Cursed Lands.

Most Curses will never manifest. Curses feed on the very essence of what they are, drawing strength from what embodies them. Some have requirements that will never be met. Others are, perhaps constantly, but it would necessarily be known.

A field may have a Curse of Sadness. Until the day when a young woman spurned by her her lover came to sit in the lonely tree in that field and cry, the Curse was never Fuelled. And the farmer who came to that field the following day and suddenly felt an immense depression fall upon him would never necessarily know a Curse was at play.

Much as the farmer himself will have a Curse. He may have a Curse of Happiness. Every time one of his Decisions makes himself or another happy, he feeds the Curse. He may live out his days, subconsciously Burning his Curse, making others happy. To his neighbours, he is just a happy guy, and his Curse is unknown. Until the day raiders came to burn down his farm. They’d already murdered and done worse to his wife. And yet he tried to plead with them. I mean, if you were terrified, you would. But the farmer would never expect it to work. When all the raiders smile, not only let the farmer go, but give him supplies for the road, perhaps then, he realises he has his Curse.

But a Curse of Happiness must be fed and this doesn’t mean the farmer himself is happy. Now, happiness will be more difficult to achieve. But he knows his Curse and how to use it. He goes to a nearby village, giving them freely his supplies. They’re very happy with this, and his Curse is Fuelled at least partially. He trades the supplies for weapons. He returns to his farm. The raiders see him… and drop their weapons, welcoming him with open arms, ready to give him a hug. The farmer repeatedly stabs the raider in the belly.

This is the day the farmer becomes a Scoundrel.

in Die By the Sword, all player characters are Scoundrels. A mix of good and bad. They aren’t necessarily all consciously aware of their Curses. But they are stronger, and more dominant than those around them, and they are making changes in the world, for good or ill.

You will tell the story of one such Band of Scoundrels.

Framing the Game

Like all of my games, there is a mechanic in place for framing that ensures all players will definitely have the opportunity to do things an equal amount. I like to ensure that the quieter and more thoughtful players, as well as those who just take longer to make decisions, get their chance to shine amongst quicker thinking, more confident players.

In this case, the concept is that you are playing characters in a fantasy novel, series of novels, novella or short story. Therefore, games are presented as Chapters, which split into Scenes. In each Scene, once a player wishes to do something where success or failure are introduced, the first Challenges are introduced. When you wish to do something, you pick from one of three Choice Types: Development, Engage and Second Wind. Once everyone has made a Choice, move onto the next Phase, and continue the Scene either until all Vital Challenges are defeated or the remaining Challenges are no longer Vital (no longer a constant narrative concern for the characters).

Scenes break down into Phases. Once you’ve picked a Choice Type, the GM records this as your Choice for the Phase. You can carry on role-playing, but as soon as you try to do something else Choice-worthy, it’s time for the GM to ensure every player has had their spotlight, before you go to the next Phase, and you get to make another Choice

Here is the optional sheet accompanying the character sheet that breaks the three Choices down in full if we wish to take a look (otherwise I summarise them next).

OfficialSheet900

Interacting With the Game World

Development will either let you regain Points you have lost so you can use them to Engage later or will allow you to gain Advantage Points (which you start with zero of, so can be the extra mileage you need when Engaging later).

Engage will either let you: attempt to reduce or gain benefits against Challenges in the Scene (with the potential risk of Failure), let you make a Choice Total against half of the Challenge’s Target Number (you cannot affect its Total, but you can make preparations, such as making Flaming Arrows as a new Trope or goading an enemy to Engage them as an Opportunity), Engage against 0 (to either make observations about the general scene or make/preparations interactions that do not relate to facing a particular Challenge) or Engage against Trope Penalties or Limits, with their Maximums or current numbers as Target Numbers, in an attempt to reduce them.

Second Wind can only be made when there are no Vital Challenges threatening you (which is going to be rare for most characters at most times). Second Wind allows you to get a large amount of Points of one type back or allows significant Limit Adjustment.

Players working with high Points may be able to give players with low Points and high Limits the chance to recover by Engaging Vital Challenges. Any Vital Challenge that is Unresolved by the end of the Phase will use its Total against at least one Scoundrel. If the GM decides their Choice Total is not a valid defence, they get 0. If they did not Engage, the Choice is at 0. If their Choice Total is a valid descriptive defence against the Challenge, either way the GM can Burn Penalty Points the player has to reduce their Choice Total, and the player cannot Burn any Points in response. However, they still need to Adjust Limits; just by reducing a Choice Total, the GM can inflict some literal damage on a player, so its important to work together and Engage those Vital Challenges.

Next Time…

I am going to get into an in-depth game-play example over several blogs, in order to show you the game in action.


The Next Game- Die By the Sword

Introduction

So once again, I am diving into the world of “diceless role-playing games that are actually closer to more narrative-influenced mechanics dice-based games than they are most diceless games” with Die By the Sword.

I have been posting bits and pieces about this on my Facebook and Twitter, but have still been nailing the core mechanics. They are now pretty much nailed, so I am making this blog to introduce (or re-introduce) to the basics of Die By the Sword.

The Basic Mechanical Concepts

For those reading this and entirely unfamiliar with this concept that I have only been hard testing for about six weeks, the basic principle is that you spend from Points to create Totals to defeat Target Numbers. The more Points you spend, the more you have to combat a Total, but the less you have for later, the more you incur negative effects for spending those Points (Exhaustion and Injury), and the more ground the GM has to throw Penalties at you for your continued description.

The game system (I am currently terming it the Burn System) works on the concept of making Choices to either Burn (spend) Points to complete tasks or Fuel (refresh) them for use later, to gain extra Points (Advantage Points) for more impressive feats or to Adjust (usually decrease) your Limits. The more you Burn, the more you will need to Adjust Limits to compensate. Your Corruption can go up and down for moral and immoral tasks. Injury and Exhaustion will increase only when Burning, or if you get Failure Points (more on those later).

Here is the single draft character sheet so you can see what I am talking about.

OfficialSheet902Delving a Little Deeper

Limits have Thresholds. If you Adjust the Limit past the Threshold, you can never Adjust it again when Burning Points. This means that Burning becomes more dangerous, as you only have two Limits to Adjust rather than 3, though you always have the possibility of Fuelling Advantage Points instead.

You can Push a Limit before or after it passes a Threshold; every Push increases the Limit, but gives a +1 on the Choice Total. Good for when your Points are running low and you are desperate, or if your Limit is past a Threshold and otherwise useless. Push or Adjust Corruption past your Threshold and you are fundamentally changed and retired at the end of the story arc (same with different results if it hits zero), Push Injury past the Threshold and you are retired at the end of the Chapter. Push Corruption or Injury to 10… that’s an instantly retired character. Say you have an Injury Threshold of 5 and zero Points. You could fight on, Pushing Injury to 10, get +5 on a Choice, and die like a badass. Push to 9, and you live on for now, but if you’re Points are lacking, you can role-play a way but likely do little else. Pushing will not Fuel Advantage Points, so this is largely what you do when you have little else left.

Your Curse is a supernatural capability you may have (and most characters will have). Your Asset can be anything from a Cursed Item, a notable item, a notable trait or companion of some form. These are your two Advantage Point options.

Each have two Decision options for Fuelling; when you make the Engage Choice, this breaks down into at least one, perhaps multiple Decisions, descriptive actions that represent the Points you Burn to add to the Choice. You write the Decisions when you make the character. It should broad enough that it will come often in play, but not so broad that it will come up all the time.

For example, if you have the Curse of War “fighting” and “killing” would not be legal Decisions for Fuelling. Too broad. However “fighting fair” and “killing with abandon” are more specific, but will also come up often, if you wish them too. However, the Curse requires combat to Fuel, which is a limitation in itself.

When Burning Points, you Adjust Limits when you erase the tick (ticks representing Fuel) from a box marked ‘Lmt.’ When you do so, you must either Adjust a Limit or Fuel an Advantage Point (Curse or Asset). However, you can only Fuel Advantages if matching their Fuel Criteria, and once the 5 boxes for each are Fuelled, they can be Fuelled any more until you Burn them.

Advantages also have Burn Criteria. You can essentially use these whenever, you just state a broad effect of what happens when you make use of your Curse or Asset. Curses are supernatural in nature, but the Burn effects don’t have to be obviously supernatural.

As Burn Decisions for War, “stabbing” and “mass death” would again be not specific enough. However “increased combat skill” and “inspire bloodlust” are more specific, whilst still being broad enough to provide the player with plenty of ideas.

You cannot Burn Advantage Points until the Phase after you acquire them.

Example: a player is up against a bog-standard bunch of conscripts, represented by the Soldier Challenge (Target 2). There are five of them, advancing with swords drawn. None have shields. The player spends a Point of Focus to drop their shield and approach their enemies, swords raised, giving them one last time to run. As the first Point spent, this Adjusts a Limit. But because this matches their Curse of War’s “fighting fair” Fuel Criteria, they Fuel a Curse Point instead. The player wants to see what the Soldiers do before spending more Points (they are currently one below the Target Number) so they counts as a Decision. The Soldiers charge in, so the player spends 2 more Focus (1 Limit Adjustment) and gains a second Curse Point, describing constantly moving between the enemies, deflecting sword blows, trying to get around them. The player is fighting in their specialised area, and less likely to take negative effects here. They will likely have at least one Trope based around combat too; let’s say they have “Professional Killer.” They Burn a Bonus Point from it, describing getting behind a Soldier and stabbing through a weak point in their armour. They now have a Choice of 3 against 2. 1 Success Point. They choose to drop Soldiers from a Total of 2 to 1.

On the next Phase, the four remaining soldiers advance. The player describes weaving their sword left and right and doubling their speed, aiming to cut down as many as possible, Burning their Curse Points to get to 2 already. That’s 1 Success Point off the bat. Unless the GM throws in some Penalties, this could be an instant win. But at a cost. The player increases Injury by 2, making a big description of cutting down each Soldier, but taking many slashes in the process.

Now, when spend Advantage Points, every box Adjusts a Limit. You cannot Fuel Advantages by Burning them. You can Adjust Corruption up or down. But there is nothing particularly corrupt or not corrupt about some descriptions; killing is often just a necessity of the situation, it’s how you kill that may be corrupt. And if your Corruption is at your Threshold and you describe a corrupt Decision… you still can’t increase Corruption without retirement. So Exhaustion or Injury are inevitable in certain situations unless you make a point of an array of moral and immoral decisions. In the game you play Scoundrels, anti-heroes, so being ultimately grey is a very much deliberate design decision.

An average character will have each Threshold at 5. You can have higher, at the cost of lowering the other two Thresholds. With a higher Injury Threshold and a lower Corruption Threshold , you are more likely to Adjust Injury than Corruption.

So hopefully you see where the risk starts to come in. And I will cover that further in later blog.

Next Time…

On the next blog I am going to discuss more about the framing mechanics, the three different Choices you can make and get a little into the setting.